Pages

Thursday, December 24, 2015

Some custom 737 panels

As a continuation of the custom job previously documented here, the three panels shown below have all been designed to fit specifically dimensioned holes in an existing build, with our customer providing us good measurements and sketches of what he required. As a result of this, some artistic license has necessarily been applied here and there, although a good balance between authenticity and compromise has always been striven for - and hopefully achieved ...
________________________

The Doors Panel


This view from the rear shows how the backing panel has been fitted onto the main panel itself, which means that the entire unit can be easily fitted into place without needing to make any allowances for any additional backing plate etc. and it's secured in place by a multitudinous array of screws to make sure that it's nice and solid.


This last photo shows the backlit panel from the side (before the rear 'light bleed' had been attended to, obviously) and gives some idea of how the embedded lighting allows it to now be kept well out of the way of the panel's 
associated hardware and/or backing panel.
________________________
The TCAS Unit


For some idea of what's involved in the design process, specifically relating to the placement of text and components on any given panel, the following image 
was the basis for the above TCAS unit. 


As you can see, the shape of these two panels are very different - the original (above) is not very high, whereas the space required to fill in our customer's simulator (below) is - and so a lot of time was spent on trying to get the proportions right. 

Below is the end result ...

________________________
The Wx Panel


An important part of designing any new panel also includes trying to replicate, where possible, knobs and buttons that also reflect those used on real aircraft parts of course. The above buttons and dual encoder knobs are an example of this.


This Weather Panel is actually going to be interfaced with our boards and so the buttons, which are backlit, have been fitted onto the rear of the panel by way of vero board. This might not look very pretty (hence no photograph from the rear!) but it's more than likely a once-off design and it'll work fine. It also means that once again there's no need for an additional backing plate - the components are already fitted.


Again, the screen capture shown below (along with the dimensions 
provided to us by our customer) provided the basis for our design,


which is here ...


The GCU475 Unit

Finally ...

This unit has been a long time in the making and initially started life in our workshop back in 2013. Since then the design has been heavily-modified and improved however, with new hardware being employed and various profiles and sizings sharpened where possible to better reflect the dimensions and 'feel' of a real unit.


The above shot is of the GCU475 sitting in a box that's been designed around it being used in a desktop situation as opposed to the normal simulator environment.


Some photos to show the backlighting 
(with special highlights given to the dust!)


For some context, the photograph below shows some of the earlier design work, although this has now been totally re-worked.

Colibri Annunciator Panel

Below are some photos of a newly-designed annunciator panel that we recently made for a Colibri simulator.

This first photos shows the panel unlit.


With the Annunciators ON ...


A view from the rear ...


And finally the interconnection board (complete with 
post-production, silk-screening modifications!)

Cessna Citation Mustang - New Panels

Over the past few months we've altered our approach to backlighting and all new panels are now constructed with this capability in mind, meaning that even our basic 'engraved only' panels are designed so that backlighting PCBs can be fitted into them now or at a later date.

Not all of our older panel sets have this feature implemented yet, as due to our workload we're necessarily approaching this on a case-by-case basis, although our King Air C90 range is 90% completed (photos to come early in the New Year) and our Cessna Citation Mustang range is finished entirely. 

Below are some photos of the Citation panels ... 


The Entire Sub-Panel Range


The Left Switch Panel


 The Right Switch Panel


 The Lighting Panel


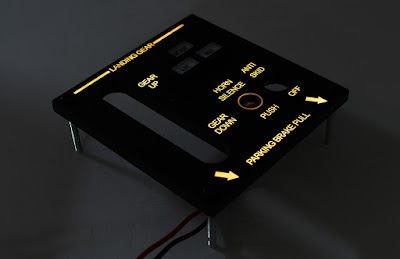
 The Landing Gear Panel


The Oxygen Supply Panel


 And then, on the MIP, the Test Switch Panel


The Oxygen Valve Panel


The completed RMC710

Almost two years ago we were working on a 710 Autopilot Unit that was based on the Garmin GMC710 (the original post is here). This unit has now been fine-tuned and completed, and the latest version is shown below:


Most of the improvements have been cosmetic and have been the result of new manufacturing processes and techniques, although the physical pushbuttons themselves now have white backlighting to better replicate the original units and the 'feel' is far superior to the ones that we've had to use in the past.


The above photograph shows one of the units under test and although the indicators appear to be incredibly bright (they are!), this reflects fairly accurately what they appear like in an authentic GMC710.