Pages

Showing posts with label annunciators. Show all posts

Friday, July 26, 2024

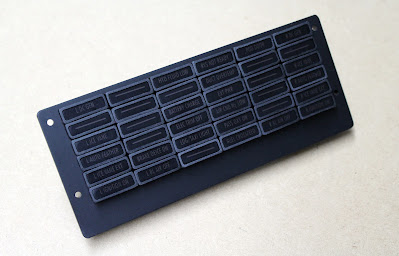
Upgraded B200 MIP Annunciator Panel

We were recently working with a customer who was building a simulator within the existing shell of a decommissioned King Air, and the space that was available for the MIP Annunciator Panel was considerably more narrow than the version of these panels that we currently make.

Because of this, we've now designed an additional version that will fit into a smaller space, and, whilst we were at it, also took the time to upgrade the look of the annunciators themselves.

Each annunciator is still a separate item, allowing them to be altered individually at a later date if required, but the 'blanking' of the text when the indicator is not illuminated has been significantly improved.


Something else that's different to our existing panel is that this version is mounted from the rear of the MIP, as shown on a test piece of material in both the first photo and the photo below:

Friday, July 05, 2024

King Air Fire Buttons

Here's a quick video that shows the Fire Buttons being tested in the B200 simulator we finished several months ago. It's only a small component, but we're very pleased with the results, as it was a complex design in a tight space.

The simulator was being housed in another local company's warehouse by this stage, as it was too large for our own workshop, hence the ambient noise. If you listen closely though, you can hear the Fire Warning audio ...

King Air Glareshield Annunciators: LCD Version

For the B200 simulator that we completed recently, we developed some new LCD Annunciator Panels to reflect those used in the real aircraft that we were basing our construction on. Here's a couple of photos of the Glareshield Annunciator Panel. 


Because of limitations related to the available sizes of TFT LCD screens, we essentially had to build this into the glareshield structure as we were putting it all together. As a result, unfortunately this item isn't currently in a state where we can offer it for general sale, although we may look into designing a more builder-friendly version in the future if there's enough interest.

Tuesday, December 24, 2019

Custom Annunciator Panel

A few months ago we had a request for a custom annunciator panel that was to be based around the standard King Air Glareshield Annunciators that we sell. The basic aspect of the panel is determined by the footprint of the LED circuit board, although we altered the shape of the unit to suit our customer's need. We also removed the dimming potentiometer from the left-hand side of the panel.


Each annunciator is a completely separate piece and can be easily removed from the rear of panel and replaced with a new/different legend at a later stage if required.


As a comparison, below is a photo of our standard King Air Glareshield Annunciator Panel, with the LEDs powered.


Four different LED colours were used in the custom panel (red, yellow, blue, and cool white), and although it's not shown very well in the photos below, the blue was actually a nice deep colour and not quite as 'washed out' as it appears here.


Prior to manufacturing the actual panel, we also provided several previews of what it would eventually look like. This allowed us to alter a couple of details, such as the wording of FUEL CROSSFEED, which was changed to the more aesthetically-pleasing FUEL X FEED.


These previews also allowed us to show how the panel could be mounted, and we could also provide the exact dimensions of the cut-out required and the placement of the mounting holes.


Thursday, July 21, 2016

ACARS Printer Buttons

Not much to say about these really: a set of custom-made buttons and indicators that were designed to fit an ACARS printer that a customer already had fitted in their sim ...


Tuesday, November 10, 2015

Using our construction plans

Back in 2008/09 we helped one of our good friends build some of the parts for his Super King Air 200 simulator - a short video of which is here - and it is from these plans that our own King Air Construction Drawings originate.

Apart from the King Air C90 simulator that we built back in 2011 - which was based on these documents but with some minor alterations made to accommodate various requirements asked for by our customer - it's not very often that we actually get to use the plans ourselves.

Recently however, the opportunity to assemble both an Overhead module and a Fuel Panel module presented itself, so we took a few photos while we had the chance to do so. Hopefully seeing what these look like after they've been constructed will help any builders who are using these same plans better envisage what the end-result is likely to be.

Please bear in mind that some of the construction panels have only been temporarily screwed together for the sake of transporting the modules as entire units to our customer. Whatever could be safely glued and screwed has been, although these modules have been left unfinished as they'll be taken apart again when received and tidied up with sanding, counter-sinking of screws, painting etc.

Firstly, the King Air C90 Overhead module:


And now for the King Air Fuel module ... (we've previously supplied the Fuel Circuit Breaker Panel to our customer, so the panel you see here is simply a blank one that we've used to ensure the correct fit) ...


These modules have also been fitted with our latest backlit panels, which we'll discuss more in a future post.

Something else that we've done in relation to these plans is to design a glareshield unit that can be easily shipped. Shown in the photo below, it requires a bit of assembly work of course, but it's a good start and comes with the three separate sections and their connecting blocks, the engraved annunciators, PCBs with pre-fitted and correctly coloured LEDs, a connection PCB, and the necessary cables.

Friday, June 28, 2013

The Main BK-117 Caution Panel

As the final post dealing with the various parts we've been designing for a BK-117 helicopter simulator, this component is by far the largest single piece although was relatively painless to manufacture (panel-wise) due its being based around our standard 30x10 annunciators. Aside from making the appropriate surround to fit our client's dimensions, it was really just a matter of customising the legends as necessary.

There are terminals for a 'Lamp Test' button to be connected, and in 
the photo above you can see that it has been connected and pressed! 

[Here's a shot of the original layout our panel was based on. 
The legends differ in places due to each Caution Panel 
reflecting a slightly different configuration.]

Cold and dead.

The LED boards that are shown fitted to the rear of the panel are actually truncated versions of those that are typically used in our King Air MIP Annunciator Panels. The matrix for those units are 6 x 6 whereas here we needed to use a 5 x 5 matrix. Designing the PCB layout (so that the PCBs can be readily used for either variation) was an interesting process and the most time-consuming for this particular piece of hardware.

The cables and PCBs will eventually be interfaced via our Conditional 64 Outputs Board, which uses RJ45 connections. Note, however, that headers are also fitted so that it can be interfaced in another way if desired.

Thursday, August 23, 2012

Kiowa Bell 206 Annunciator Panel

This particular panel has been designed for a Kiowa simulator (a military variant of the Bell 206) and will employ 14 specially engraved annunciators that we've already supplied to our customer. As a result of this panel being supplied separately however, this unfortunately means that we don't have a full set of the proper annunciators fitted. 

For purposes of illustration, we've populated the panel in these photographs with some spare annunciators that we had sitting around the workshop - the legends, of course, will not be correct (!) ...


This first photograph shows one of the indicators illuminated on our workbench. For the annunciators to be made functional, we're supplying a slightly modified version of our usual Annunciator Controller and LED Circuit Boards along with this panel (some modification was necessary to account for the annunciators here having slightly different dimensions and layout to those normally supplied with our Annunciator Hardware).


The panel again uses our dummy Dzus fasteners and the switches shown above are captured 'between panels' so that it becomes a stand-alone unit. 

As with all replicas of course, certain aspects just aren't viable to reproduce in exact detail, and so the glass window here is merely a dummy feature; there is no actual hinge for it to swing open. Our goal, as always, is to find (and hopefully provide) a good balance between cost, functionality, and appearance for our customers.


The dimensions of the entire panel are 230mm (high) x 55mm (wide) and the design was developed from the photographs below along with some measurements that were supplied to us.

Apologies for not attributing the above photos to the photographer - 
we're not exactly sure where they came from!

Wednesday, August 08, 2012

Latest Bell 206 Indicator Configuration

As a result of a customer's request (and always wanting to improve our products), we've now added another possible configuration to our Bell 206 Annunciator Panels. Whereas our initial design employed black legends with orange or red illumination, this latest version uses a more accurate combination of orange on black, black on orange, and black on red. 


The following photographs show the relative differences when the indicators are illuminated in different light conditions. The top photo is how they appear on our workbench beneath some fairly bright overhead fluorescent lights, and the middle one is an approximation of how they look in condirtions that are much darker and probably closer to that seen in actual simulator (my amateur camera work is responsible for the slight 'burning out' of the legends ... !) 


Above is also a more detailed view of the Replica Korry Legends whilst the photograph below perhaps gives a better perspective of the various thicknesses involved.


As for the method of illumination, we're using the Annunciator LED Circuit Boards that are supplied along with the rest of the Annunciator Panel. There are actually two boards connected side-by-side (below you can see me holding just one of them), as configuring the boards in this manner allows us a greater range of freedom in the future and means that we can use them for units housing more annunciators than the twenty shown here.  


In the picture above, the circuit board at the top left of the photo is actually our Annunciator Controller Board, which is supplied as a separate item along with its own software. The software allows the user to program a variety of conditions under which certain annunciators will be illuminated. We'll write up some more detailed information about how exactly this works shortly ... 


Shown above, this is how the LED circuit boards and the annunciator panel look like from the rear, and to accommodate for the fact that each builder's glareshield thickness is likely to be different (and to allow for the widest range possible) our LEDs are actually mounted (unshortened) into adjustable LED sockets. This allows them to be simply pushed in to sit at the correct depth without any soldering or screwing etc. (or to change LED colours if you use them for a different application) ...

The LEDs used here are all ultra-bright, rounded 5mm LEDs, with all of them except for those behind the red legends being white in colour. White LEDs are good for illuminating most colours, but when it comes to lighting red material, red light will work much better.

The Annunciator LED Circuit Boards have the 'Lamp Test' functionality built in, so you just need to connect your pushbutton. (The pushbutton is already supplied with our B206 Annunciator Panel, of course)

Friday, June 22, 2012

Custom Annunciator Software

Subsequent to the annunciator panel that we recently designed for the Bell 206, we are currently working on an Annunciator Panel Program and Annunciator Controller Board that can be fully customised to control various annunciator lights. 


The reason for writing this software is because we’ve previously found it necessary to write (sometimes complex) work-arounds for various CAUTION / WARNING indicators because the actions themselves are not normally part of the operations within MSFS or FSUIPC. These calculations have been hard-coded into the various units that we've built for customers, but this means they cannot then be readily altered.

By providing this software as a stand-alone feature (in conjunction with our new Annunciator Controller Board) however, we're hoping it will allow cockpit builders a wider scope as to which annunciators they want to action and how they go about making this happen. Previously, all of this had to be done during the manufacturing/software writing process and required that we learn and understand the detailed operations of each aircraft type we worked on. Whilst we enjoy learning about this of course, simmers with specific knowledge about the actual aircraft they're building, will undoubtedly have a much more intimate knowledge of what they require.

Below is a quick sample of the configuration program showing how you can have multiple conditions to control each light (click on the image to get a readable view!). You can have a combination of conditions grouped together and there is also an ‘OR’ section so that you can set up a wide range of separate conditions to be implemented. By using the 'between' or 'equals' parameters, it is possible to set up most conditions you will need. The example shown here will turn ON the ROTOR LOW RPM annunciator when the Rotor RPM is between 0 and 90%, OR when the engine is not running. This means that the annunciator will only be OFF if the engine is running and the Rotor RPM is above 91% which is what we need of course.


Each annunciator can be named according to its function, and prior to any conditions being set up all of these fields will be empty.

This program operates with our Annunciator Controller Board, which has ribbon cable connections to our B206 Annunciator Panel, but is also easily connected to your own customised annunciator panel. When the program is run, you can see the annunciators being lit on the screen as well on the panel itself, but normally you would minimise this when flying your aircraft.


Note: For illustration purposes only, the above screenshot shows our 
annunciator software running alongside the default FS2004 Bell 206

Wednesday, May 30, 2012

Bell 206 Annunciator Panel

As well as continuing with the fixed wing variety, we've also been doing a lot of work lately with some new products related to helicopter flight simulation. More specifically, our new range will be based around the Bell 206. Our designs for these products have been geared around the DodoSim FSX206 software and to enable actual encoders, toggle switches, buttons, and circuit breakers to be used instead of key-presses and mouse-clicks, we have written special code for our I/O boards.

This specially written code allows the use of one each of our 64Input Boards and 64Output Boards to interface to the DodoSim FSX206 software through FSX and FSUIPC so that all of the following controls work correctly :

  • Annunciators (including press to test)
  • Fuel Valve Switch
  • TOT Button
  • Warning Mute Button
  • GPS/NAV Switch
  • Altimeter (QNH) setting Encoder
  • Course setting Encoder
  • Heading setting Encoder
  • ADF setting Encoder
  • VOR setting Encoder
  • Hydraulic Switch
  • Anti-Icing Switch
  • Dim Caution Lights Switch
  • Generator Switch
  • Avionics Switch
  • Battery Switch
  • Position Lights Switch
  • Instrument Lights Switch
  • Anti-Collision Lights Switch
  • Dir/Gyro Switch
  • Pitot Heat Switch
  • AFT Fuel Pump Circuit Breaker
  • FORE Fuel Pump Circuit Breaker
  • Caution (Annunciator) Circuit Breaker
  • Generator Field Circuit Breaker
  • Difficulty Level (We use a Rotary Encoder)
  • Audio Ident Switches


The majority of this work has already been done and we've had the programs running in our workshop over the past few weeks. 

Matters of the more external nature took something of a leap forward yesterday however, with the completion of our newly-designed Bell 206 Annunciator Panel (shown below). 


The annunciators we've designed here are individual replicas of a korry 
we've had in our workshop for a while: a beautifully engineered work 
of art manufactured by Les Modeles Francais. 

Below is a photograph of one of our early prototypes 
alongside the original LMF Korry.


The fact that these annunciators are built as separate units means that they
are readily replaced or upgraded as per the needs of each individual
customer. As our software has been designed around the DodoSim
layout however, that is the typical configuration that we would supply.


This annunciator panel fits the Bell 206 MIP we've been developing also,
which is being constructed along similar lines to the
King Air MIP panels that we already sell.

Below are a series of photos which show the annunciators under different
conditions. The first, as attested to by the 'glass'(!), is under the bright
fluorescent light above one of our workspaces. The legends are readable
(though barely), and it's obvious that none of them are lit; hence all is well.


Below, in the same bright conditions, we now have one of the annunciators lit.


And finally, we see how the same annunciator would likely appear in a 
darkened simulator. The light bleed at the rear, and the wires extending 
from the LEDs, would not be seen in the final product of course, 
as these photos are presently just for demonstration purposes.


Once we have this annunciator panel fitted to the MIP and interacting
with FSX, we'll upload a video to our YouTube channel.