Pages

Friday, July 05, 2024

B200 Fuel and Overhead Modules

Here are both the overhead module and the fuel module for the B200 simulator that we worked on last year.

Again, these versions are slightly different to those shown on our website, as they were both custom-built for training purposes and needed to reflect the specific layout of our customer's real aircraft.


The fuel gauges seen here are the GSA-061 models from Flight Illusion


B200 First Officer Left Panel

The majority of the panels we make use cool-white backlighting, although in this instance our customer required warm-white, which is closer to the look offered by traditional incandescent bulbs.

Because this panel is being used in a training environment, the necessary locking toggle switches were also fitted. These aren't standard on our panels, but we're always happy to discuss options such as this.


Basic MIP Layout for a Cessna Citation Simulator

To help anyone who might be building a Cessna Citation simulator, we now offer a very basic MIP design that can be downloaded for free from either our website (as part of our Citation panel documentation) or separately, from here: https://buff.ly/46NhLc1

This design is in DXF format, and contains the panel cutouts for all of the relevant Citation panels that we sell. The G1000 units, the audio panels, the GMC710, and the standby gauges, however, are merely placeholders designed to help you with layout planning. You can alter the DXF files to suit whichever products you intend to use.


B200 Pedestal Unit

 A few quick photos of our latest B200 Pedestal Unit ...


B200 Captain Right Panel

Another B200 panel that has a different configuration from the standard B200 panels that we sell. This panel was customised for the B200 simulator that we recently built for a local customer, and included all of the wiring!


Replica Pro Line Fusion Console Controls

Designed to emulate the Pro Line Fusion Console Controls, our PL-F Pedestal Assembly comes equipped with two Cursor Control Panels (CCP), a Multi-Function Keypad Panel (MKP), dual BARO Single Knob Panels, and a set of two TILT Single Knob Panels (SKP).

This complete module package includes dual controllers—one specifically for the MKP and another for the operation of the CCPs and SKPs.


Communication with the flight simulator is made possible through FSUIPC macros, requiring a valid FSUIPC license. Users have the freedom to generate customised macros for button and encoder interfacing. Technical details for serial port connections and command outputs are available upon request for those interested in crafting their own software solutions.


B200 ELT Panel and Housing

Also for the previously mentioned B200 simulator, situated just behind the Fuel Module on the Captain's side, this panel contains a replica Emergency Locator Transmitter (ELT), as well as a dummy gauge for the outside temperature. 


Replica GCU477

The simulator that we built for a local company last year used software that already had its own G1000 built into it, although we're actually bypassing this and using our own 477 unit in conjunction with the G1000 hardware from EFIS Fly https://buff.ly/457BiSO
 
We designed and built this keypad to replicate the look and (more importantly) the function of the GCU477 from Garmin, and our software allows it to communicate directly with either the native simulator software or the EFIS Fly software. 
 
Housed in the central console, the 477 unit provides physical controls—knobs and buttons—for the G1000 NXi system. Waypoints, frequencies, and other navigation data can be entered via the 477, which then updates the corresponding fields on the G1000 NXi display.


B200 Captain Left Panel

Last year we overhauled an entire B200 simulator with a newly-designed set of panels that mimic those found in the real aircraft, as our customer was replicating it for training purposes.

Here are some photos of the Captain Left Panel ... 


Friday, October 21, 2022

TBM-900 Main Instrument Panel (DXF)

We're not in a position to be able to offer a full TBM-900 main instrument panel, although because we needed to draw up an initial design around which we could organise the panels that we do make, we thought that these drawings might provide a useful starting point for someone beginning to build a simulator, instead of the files simply hiding away in our file system ...

The DXF (along with a PDF file) can be downloaded directly from our website on the following page (you'll need to scroll through to find it): https://www.ruscool.co.nz/Panel-Cutouts-Dimensions/

Below is a quick image of the model from which the DXF is derived.


The measurements are not based on a real TBM-900 aircraft, so they will not be accurate for this, but the dimensions can be modified within your own drawing software to suit the width/height of your cockpit's construction.

The design was based around the use of 3mm aluminum, and the holes and cutouts for the following Ruscool Electronics parts are included (shown fitted below, with the exception of the 15" MFD):

    - Master Caution Button
    - Master Warning Button
    - De-Icing Panel
    - Park Brake Panel
    - Gear Panel
    - ECS Panel
    - CB Lighting Panel
    - Static Source Selector Panel
    - Crew Music Panel
    - 15" MFD Unit

The DXF for the main instrument panel only shows the hole cutouts and mounting screw positions of the aforementioned panels (not their outer dimensions), although the drawings for these can be downloaded from the same page as the MIP design.

There are, of course, still several other items needed for a full TBM cockpit that you'll want to include, but which we don't sell ourselves - such as the GMC710, the GCU475, and the G1000 units. These parts will need to be added to your design separately, and suppliers who manufacture these items will likely be able to provide you with the necessary dimensions so that you can incorporate them.

Wednesday, September 28, 2022

Additional TBM-900 panels

Over the past few months we've designed several new TBM-900 panels to go with our existing range ...

Circuit Breaker Lighting Panel


This panel includes one of our replica Korry buttons, which in the above photos is shown without any lighting. In the photo below, the lower half of the Korry has been illuminated. Our replica Korry pushbuttons have been designed to fit into the same footprint as a real Korry 389 button, as shown in a previous post about our B350 Reversionary Panels, so they can be swapped out if required.

 
Crew Music Panel

 
As with the majority of our panels, there is no interfacing or controller supplied. There are so many possible solutions - when it comes to both hardware and software - that we leave this up to our customers. Our panels are supplied fully assembled, however, with any switches, sockets, etc. mounted either directly onto the front panel or onto a mounting plate that's fitted onto the rear.

 
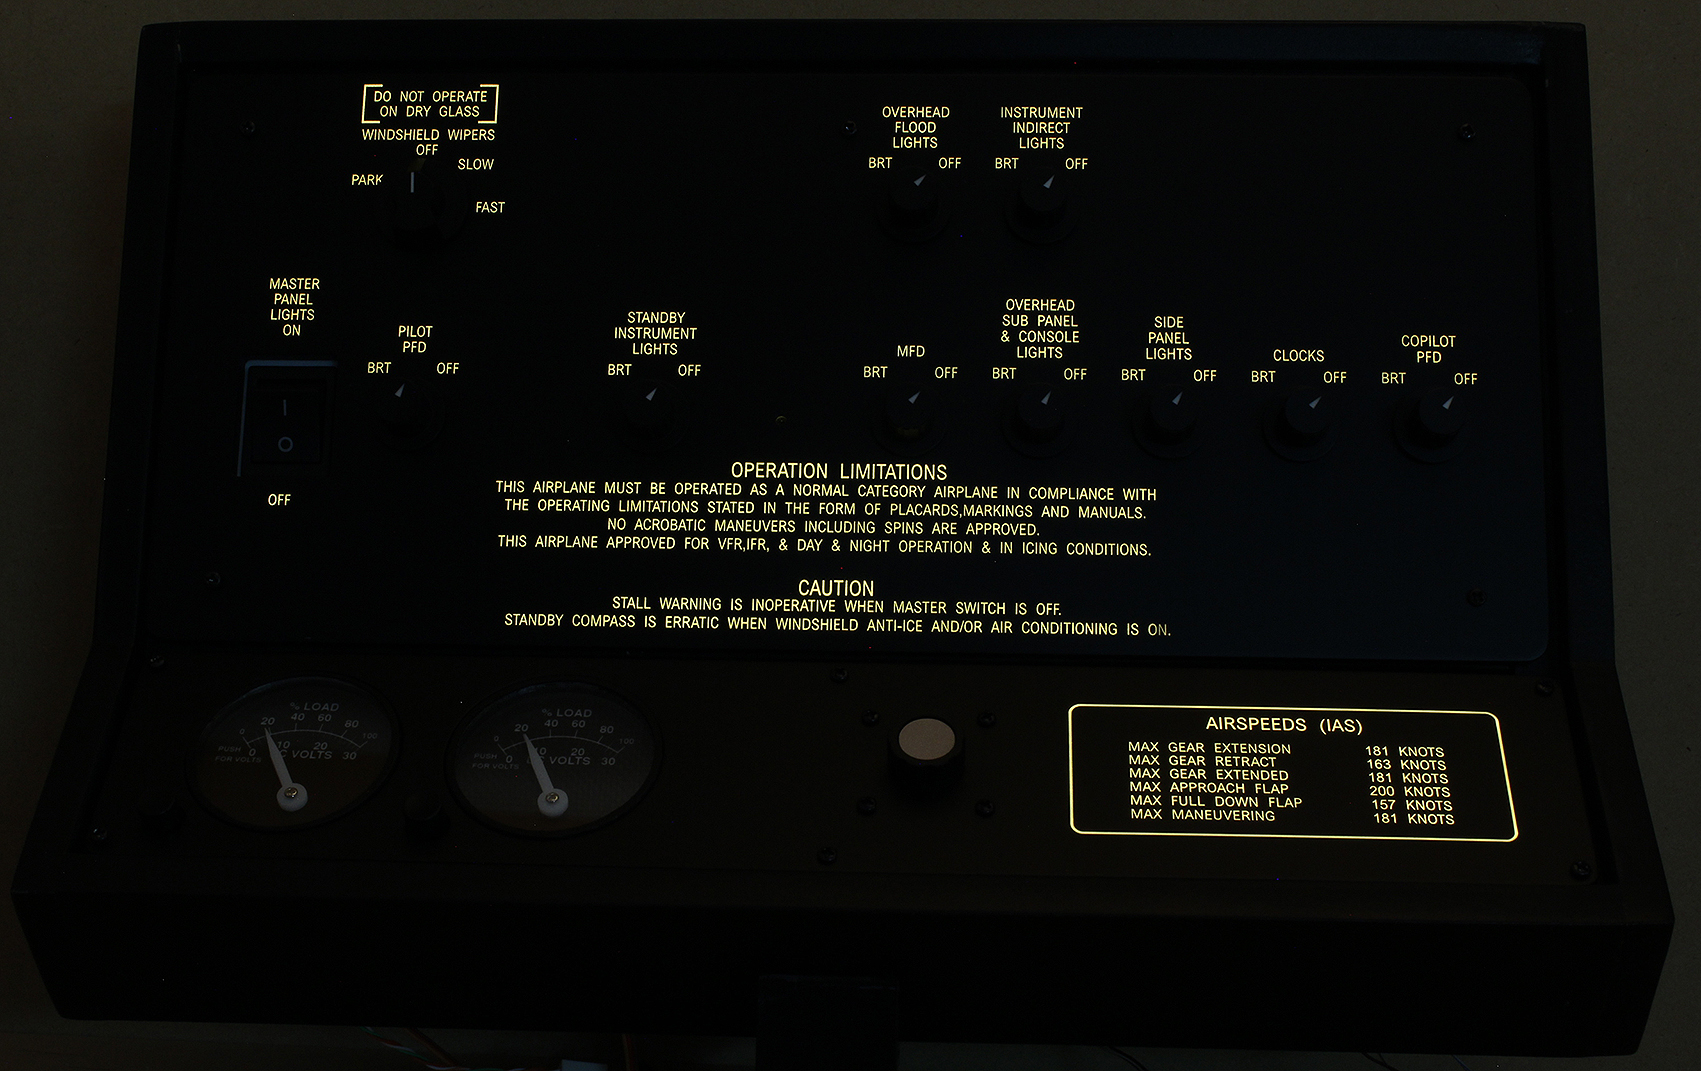
Main Circuit Breaker Panel - Lower Section

This panel, with the exception of the coloured vinyl decals and the dummy circuit breakers themselves, is fully backlit by a circuit board that's recessed into the main panel itself. 

Whilst we only fit dummy circuit breakers to it, the panel has been designed so that these can be readily replaced by real circuit breakers if required. There are several PDFs on our website that contain not only the panel dimensions and required panel cutout, but also the spacing and layout of the circuit breakers, so that the fit of any real breakers can be checked/verified prior to purchasing.

 
Main Circuit Breaker Panel - Upper Section 


You'll notice that there's a hole in the missile switch cover, which was a slight modification that we made so that it acts like a gate that allows you to switch it between NORM and EMER but still have that position maintained. Without this hole, the closed cover would push the toggle switch back into the EMER position each time. The only slight issue is that in order to do this, it was necessary to remove the spring that sat inside the switch cover, although because panel sits mostly flat, the cover will tend to fall closed by itself anyway ... !


And this is what the fully-assembled panel looks like from the rear ...

 
Static Source Selector Panel


There's not too much to say about this one really, although the image below offers a good example of how we typically mount components to our panels.

Monday, March 07, 2022

Fusion Pedestal for King Air B350

As we've been documenting in the past few posts, here's the finished and fully-assembled pedestal panel that we recently completed for a King Air B350 simulator.


And a quick shot of the pedestal prior to painting and engraving etc.